TabStrip1.SelectedTab = TabStrip1.Tabs[1];
MultiPage1.SelectedIndex = 1;
MultiPage1.SelectedIndex = 1;
<%@ Register Assembly="FreeTextBox" Namespace="FreeTextBoxControls" TagPrefix="FTB" %> <html xmlns="http://www.w3.org/1999/xhtml"> <head runat="server"> <title>Richtextbox Sample</title> <script type="text/javascript"> function validate() { var doc = document.getElementById('FreeTextBox1'); if (doc.value.length == 0) { alert('Please Enter data in Richtextbox'); return false; } } </script> </head> <body> <form id="form1" runat="server"> <div> <table> <tr> <td> <FTB:FreeTextBox ID="FreeTextBox1" runat="server"> </FTB:FreeTextBox> </td> <td valign="top"> <asp:GridView runat="server" ID="gvdetails" AutoGenerateColumns="false"> <Columns> <asp:TemplateField HeaderText="RichtextBoxData"> <ItemTemplate> <asp:Label ID="lbltxt" runat="server" Text='<%#Bind("RichtextData") %>'/> </ItemTemplate> </asp:TemplateField> </Columns> </asp:GridView> </td> </tr> </table> </div> <asp:Button ID="btnSubmit" runat="server" OnClientClick="return validate()" Text="Submit" onclick="btnSubmit_Click" /><br /> <asp:Label ID="lbltxt" runat="server"/> </form> </body> </html> |
 |
Column Name | Data Type | Allow Nulls |
Id | Int(Set Identity=true) | No |
RichTextData | nvarchar(MAX) | Yes |
using System.Data; using System.Data.SqlClient; |
<html xmlns="http://www.w3.org/1999/xhtml"> <head id="Head1" runat="server"> <title></title> </head> <body> <form id="form1" runat="server"> <div> <table> <tr> <td align="right"> <asp:ImageButton ID="btnExcel" runat="server" ImageUrl="~/ExcelImage.jpg" onclick="btnExcel_Click" /> <asp:ImageButton ID="btnWord" runat="server" ImageUrl="~/WordImage.jpg" onclick="btnWord_Click" /> </td> </tr> <tr> <td> <asp:GridView runat="server" ID="gvdetails" DataSourceID="dsdetails" AllowPaging="true" AllowSorting="true" AutoGenerateColumns="false"> <RowStyle BackColor="#EFF3FB" /> <FooterStyle BackColor="#507CD1" Font-Bold="True" ForeColor="White" /> <PagerStyle BackColor="#2461BF" ForeColor="White" HorizontalAlign="Center" /> <HeaderStyle BackColor="#507CD1" Font-Bold="True" ForeColor="White" /> <AlternatingRowStyle BackColor="White" /> <Columns> <asp:BoundField DataField="UserId" HeaderText="UserId" /> <asp:BoundField DataField="UserName" HeaderText="UserName" /> <asp:BoundField DataField="LastName" HeaderText="LastName" /> <asp:BoundField DataField="Location" HeaderText="Location" /> </Columns> </asp:GridView> </td> </tr> </table> <asp:SqlDataSource ID="dsdetails" runat="server" ConnectionString="<%$ConnectionStrings:dbconnection %>" SelectCommand="select * from UserInformation"/> </div> </form> </body> </html> |
<connectionStrings> <add name="dbconnection" connectionString="Data Source=SureshDasari;Integrated Security=true;Initial Catalog=MySampleDB"/> </connectionStrings> |
 |
using System.IO; |
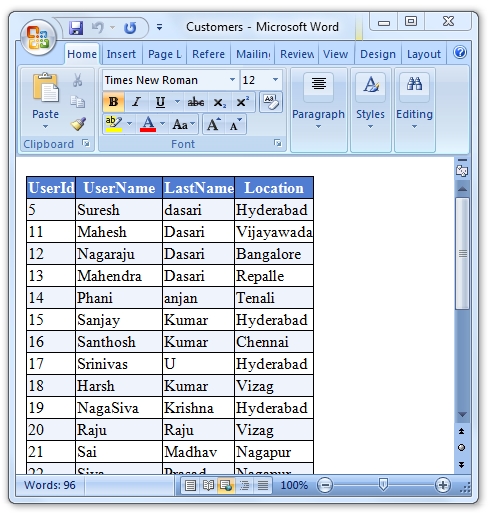
public override void VerifyRenderingInServerForm(Control control) { /* Verifies that the control is rendered */ } /// <summary> /// This event is used to export gridview data to word document /// </summary> /// <param name="sender"></param> /// <param name="e"></param> protected void btnWord_Click(object sender, ImageClickEventArgs e) { gvdetails.AllowPaging = false; gvdetails.DataBind(); Response.ClearContent(); Response.AddHeader("content-disposition", string.Format("attachment; filename={0}", "Customers.doc")); Response.Charset = ""; Response.ContentType = "application/ms-word"; StringWriter sw = new StringWriter(); HtmlTextWriter htw = new HtmlTextWriter(sw); gvdetails.RenderControl(htw); Response.Write(sw.ToString()); Response.End(); } /// <summary> /// This Event is used to export gridview data to Excel /// </summary> /// <param name="sender"></param> /// <param name="e"></param> protected void btnExcel_Click(object sender, ImageClickEventArgs e) { Response.ClearContent(); Response.Buffer = true; Response.AddHeader("content-disposition", string.Format("attachment; filename={0}", "Customers.xls")); Response.ContentType = "application/ms-excel"; StringWriter sw = new StringWriter(); HtmlTextWriter htw = new HtmlTextWriter(sw); gvdetails.AllowPaging = false; gvdetails.DataBind(); //Change the Header Row back to white color gvdetails.HeaderRow.Style.Add("background-color", "#FFFFFF"); //Applying stlye to gridview header cells for (int i = 0; i < gvdetails.HeaderRow.Cells.Count; i++) { gvdetails.HeaderRow.Cells[i].Style.Add("background-color", "#507CD1"); } int j = 1; //This loop is used to apply stlye to cells based on particular row foreach (GridViewRow gvrow in gvdetails.Rows) { gvrow.BackColor = Color.White; if (j <= gvdetails.Rows.Count) { if (j % 2 != 0) { for (int k = 0; k < gvrow.Cells.Count; k++) { gvrow.Cells[k].Style.Add("background-color", "#EFF3FB"); } } } j++; } gvdetails.RenderControl(htw); Response.Write(sw.ToString()); Response.End(); } | |
 |


<form id="form1" runat="server">
<div>
<asp:TextBox ID="TextBox1" runat="server">
</asp:TextBox>
<asp:Button ID="Button1" runat="server"
                         onclick="Button1_Click"
                         Text="Click to write to word" />
<br />
<asp:TextBox ID="TextBox2" runat="server">
</asp:TextBox>
<asp:Button ID="Button2" runat="server"
                         onclick="Button2_Click"
                         Text="Read Word Document" />
</div>
</form>
using System.IO;
using System.Text;
protected void Button1_Click(object sender, EventArgs e)
{
    //Create stringBuilder to write formatted
    //Text to word file
 StringBuilder strBuilder = new StringBuilder();
 strBuilder.Append("<h1 title='Header' align='Center'>
     Writing To Word Using ASP.NET</h1> ".ToString());

 strBuilder.Append("<br>".ToString());
 strBuilder.Append("<table align='Center'>".ToString());
 strBuilder.Append("<tr>".ToString());

 strBuilder.Append("<td style='width:100px;color:green'>
                          <b>amiT</b></td>".ToString());

 strBuilder.Append("<td style='width:100px;color:red'>
                              India</td>".ToString());
 strBuilder.Append("</tr>".ToString());
 strBuilder.Append("</table>".ToString());

 string strPath = Request.PhysicalApplicationPath
                         + "\\document\\Test.doc";

 //string strTextToWrite = TextBox1.Text;
 FileStream fStream = File.Create(strPath);
 fStream.Close();
 StreamWriter sWriter = new StreamWriter(strPath);
 Writer.Write(strBuilder);
 sWriter.Close();

}
protected void Button2_Click(object sender, EventArgs e)
{
 string strPath = Request.PhysicalApplicationPath
                  + "\\document\\Test.doc";
 FileStream fStream = new FileStream
            (strPath, FileMode.Open, FileAccess.Read);
 StreamReader sReader = new StreamReader(fStream);
 TextBox2.Text = sReader.ReadToEnd();
 sReader.Close();
Response.Write(TextBox2.Text);
}
Protected Sub Button1_Click
(ByVal sender As Object, ByVal e As EventArgs)
Dim strBuilder As New StringBuilder()
strBuilder.Append("<h1 title='Header' align='Center'>
     Writing To Word Using ASP.NET</h1> ".ToString())
strBuilder.Append("<br>".ToString())
strBuilder.Append("<table align='Center'>".ToString())
strBuilder.Append("<tr>".ToString())

strBuilder.Append("<td style='width:100px;color:green'>
                           <b>amiT</b></td>".ToString())
strBuilder.Append("<td style='width:100px;color:red'>
                               India</td>".ToString())
strBuilder.Append("</tr>".ToString())
strBuilder.Append("</table>".ToString())
'string path = @"C:\Test.doc";

Dim strPath As String =
Request.PhysicalApplicationPath & "\document\Test.doc"

'string strTextToWrite = TextBox1.Text;
Dim fStream As FileStream = File.Create(strPath)
fStream.Close()
Dim sWriter As New StreamWriter(strPath)
sWriter.Write(strBuilder)

sWriter.Close()
End Sub

Protected Sub Button2_Click
(ByVal sender As Object, ByVal e As EventArgs)
Dim strPath As String =
Request.PhysicalApplicationPath & "\document\Test.doc"

Dim fStream As New FileStream
(strPath, FileMode.Open, FileAccess.Read)
Dim sReader As New StreamReader(fStream)
TextBox2.Text = sReader.ReadToEnd()
sReader.Close()
Response.Write(TextBox2.Text)
End Sub


